"". content='3d4620b7bc91f474c9424106dd2800b5' name='p:domain_verify'/> Room RX: Kid Spaces
Showing posts with label Kid Spaces. Show all posts

Thursday, February 13, 2014

Shared girl's room with vintage touches

A new offering in my CSIL's etsy shop, Therese Marie Designs inspired me to create a bedroom design for my cousin's two little girls. 
Jesse and I worked together to create a darling nursery for her older daughter and now that there are two girls, the idea of a shared a room down the road seems just right.

Could this pillow be any more adorable? 
Custom made with the name and letter of your choice this is the PERFECT baby gift...
or gift for a "little" who's room is getting re-decorated, 
or maybe even as a teacher gift - T is for Teacher!
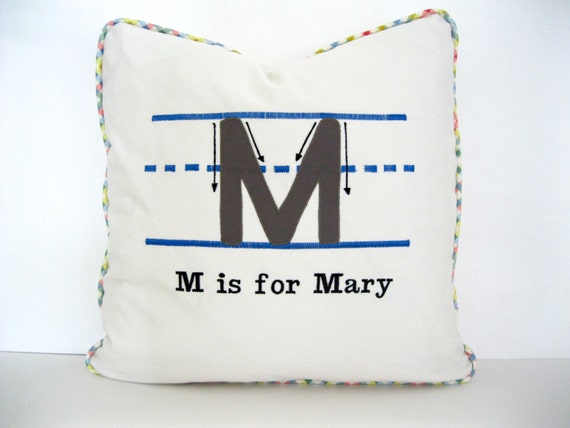

A little vintage fun was what I was after for this room. 
After rounding up
a fun DIY wall treatment
a graphic fabric made into shades
and of course the pillow that got the ball rolling

Here is my design plan....


This room feels so happy to me, just the place for sisters to become best friends!!!
Did you share a room as a kid or do your children share a space? Do tell....

Today I am excited to share that Erin at House of Turquoise is featuring some 
I love Erin's blog and have become familiar with some of the most inspirational and creative people and businesses through it. What a thrill to share some cyberspace with all of them.
Thank you Erin!


--------------Cathy--------------

Does your room need a “prescription” for a change of decor, function or design?  I would love to work with you to help your room "feel better."  
Contact me for more information about my design services.

Thursday, November 7, 2013

One Room Challenge: teen room tweak reveal!

Well, the day has arrived, the One Room Challenge reveal! If you have been following along, you don't need any narration, just some good after shots.
If you are just tuning in, you can get the back story here:
Week #1   Week#2   Week #3    Week #4   Week #5

Here we go with the visuals….

Remember the before?

 And now…..


So that's that! The room is "done" though I artfully did not photograph the ceiling fan because it did not get zushed up. I am hoping to convince the accountant that I am married to that the yucky fans in the kids rooms need to be upgraded. Wish me luck!

So now hurry yourself on over to Linda's blog and see what all of the other folks have pulled off in their spaces at the
One Room Challenge linking party

And then if you haven't already, go see the final reveals of the official ORC participants.
Some amazing spaces and incredible talent out there.

Many thanks to Linda for all of the hard work on her part to keep the energy going on the ORC each week.
I don't know about you, but now that the ORC is over, I got nothin' but time on my hands!
Best gear up for the holidays or something.
Maybe I'll even get really organized and start planning for the next ORC.
Or maybe I'll go take an another after picture of my daughter's room, because you know it is already a mess again, right?!!!
Keeping it real…..
Thanks for sticking with me over the past 6 weeks, such fun!

--------------Cathy--------------

Does your room need a “prescription” for a change of decor, function or design?  I would love to work with you to help your room "feel better."  
Contact me for more information about my design services.

Thursday, October 31, 2013

One Room Challenge: Linens and pillows

 Happy Halloween to everyone! Got your jack-o-lanterns, costumes and candy ready? I have been restraining myself on the candy front, just bought it yesterday, but I will admit, I did sneak some...!!!

Well it is week #5 of the One Room Challenge link up and I am excited about how the linens and pillows look in my daughter's room.

 I actually did another couple of DIY's in her space. I made a duvet cover from a couple of sheets I had on hand. Can I have a round of applause? 

Generally I like to hire such projects out, but being on an essentially nonexistent budget, I did it myself. And it turned out pretty well. I won't bore you with the how to as there are tons of tutorials out there and it takes more time than skill. This week I had a little bit of time and maybe a tiny bit of skill!

My CSIL made a couple of pillows which were added to the ones we already had.
Like this green and turquoise number…. (sitting on top of the duvet cover I made….see it???!!!)

And this lovely in the Thomas Paul peacock, all trimmed in orange.


The other pillows have been in my daughter's room forever and are normally on the floor, not all neat and tidy on the bed, if you get my drift!


I know you are jealous, why can't you have a CSIL like me??? Someone who can make gorgeous pillows and stuff. Well fear not, if you read my post from the other day, you will know that Therese will be offering her pillows for sale very soon and you too can own some!

Oh, I almost forgot to tell you about my other DIY….
I framed and matted the sea life prints on the wall.
I had it all on hand, a calendar from 2009,
frames from Michaels from another project and the time…. nothing too challenging.
And the best part? My daughter had seen the prints and asked to have them in her room!

Well I am off to link up and see what the other participants are up to:
Week #5 of the One Room Challenge linking party

And if you missed it yesterday go see the goodness in store with the
Week #5 ORC official participants!

Have a fun Halloween!

--------------Cathy--------------

Does your room need a “prescription” for a change of decor, function or design?  I would love to work with you to help your room "feel better."  
Contact me for more information about my design services.

Thursday, October 17, 2013

One Room Challenge: the dresser do over

This project was a test of patience for me, the sanding alone took what seemed like hours. Then there was the primer and a couple of coats of paint...  I have mentioned my DIY-ADD before (hundreds of times I think,) but I like to see the finished product and am much happier when someone else finishes it for me. However, on a budget, a girl has to do these things for herself, so I toiled away for the sake of my daughter's room and my accountant husband's request. 

I must say the crisp cream is a vast improvement over the previous stripes and checks and someday when I am more inclined, I may try to pretty up the base of this dresser, for now though, I am pleased with the result.

The fun knobs were a World Market find and inspired the mirror color. I added the sliver of gold with a  paint marker I had on hand just to give the piece a little oomph.

I like it!!! 

So here is what has been accomplished so far in the "Teen Room Tweak"
 1) Closet and dresser are purged
2) Carpet stains - gone
3) Replaced the rug
4) Painted the dresser
5) Shade has been repaired

Yet to be completed:
6) Update the wall decor
7) Do something with the bed linens and pillows
8) Rearrange the furniture
9) The ceiling  fan....

If you are new to Room Rx go here to see week 1 of the One Room Challenge and here to see week 2. Please plan to come back over the next 3 weeks to see this Do It Yourself quasi-makeover
 by a Non-DIY girl.

Also be sure to head on over to Calling It Home to see what the other participants of the linking party are up to this week.

And if you happen to have and extra hour or two to spare, go see what the official ORC Participants are accomplishing on their projects!

Good stuff people, lots of super creative and clever folks out there....


--------------Cathy--------------

Does your room need a “prescription” for a change of decor, function or design?  I would love to work with you to help your room "feel better."  
Contact me for more information about my design services.

Thursday, October 10, 2013

One Room Challenge: housekeeping + inspiration

The first order of business in my daughter's room was the cleanse and purge, no small task as I think my girl had saved every piece of sports apparel and sentimental goodie that she has owned since she was 5!  Some unsightly spots and stains on the carpet revealed themselves during this process and since the carpet won't be replaced until I know my girl will only be a temporary resident in our home, (sometime after she leaves for college) I had to figure out how to remove them. I also did not want to think about how they got there...

Pinterest to the rescue!!!
Some time ago I had saved to my Green & Clean Board a "magical" carpet cleaner  and
I have to say, the stuff worked beautifully.There was a lot of scrubbing involved, so my arms and back were sore, but this was all in the name of work done as a labor of love, right?
Next it was onto the shades, I had my workroom re-string them and they now work like a charm again.
Hopefully they will continue to function despite the savage cord yanking that happens on a daily basis.

With the basics now in place and a "deep cleaning of the room" finished, the fun could begin, which brings me to my inspiration. Since this tweak was of the low/no budget variety, I had to work with the fabrics and colors already in the room....

A great rug find at TJ Maxx set the wheels in motion as it added a bold turquoise and graphic pattern to the oranges and greens already present. Once I found a few fun fabric patterns to further play up the turquoise, (having a talented CSIL to sew a few pillows came in handy for this project) as well some key accessories, I was off to the races.

Don't forget to make time to head over to Calling it Home and see how all of the other folks are doing  on their projects. There are over 70 people working on something or another so set aside some serious time!!!

Go here when time allows...

--------------Cathy--------------

Does your room need a “prescription” for a change of decor, function or design?  I would love to work with you to help your room "feel better."  
Contact me for more information about my design services.

Thursday, October 3, 2013

One Room Challenge: The Teen Room Tweak

Last week I gave a glimpse of my daughter's room with a project I completed
 and some time ago I shared my frustration with the typical state of her room. 

Since she spent a semester in Chile last Spring I decided that the time was right to take care of a few things in there. Nothing major and totally on a budget (though I did make a couple of purchases.) My mission was to clean the look up and to make the space better reflect her age and interests as well as  more conducive to doing homework and hanging out with friends.

So in keeping it real, this is pretty much how her room looked when she left....


And yes, my girl is a little bit of a slob....sigh....

Since I was not going to paint, replace the light fixture or any major furniture, the little things would be making an impact. This was my plan:


 I do have a disclaimer, this is a space that is already done, not a work in progress. Regardless, each week for the next six, I will share how I tweaked the space and then surprised my daughter when she arrived home after 5 months away. 

I will also be taking part in Calling it Home's ORC Linking Party

Many thanks to Linda for inviting us to share in the creativity of a select group of 20 with her 
One Room Challenge and for inviting the rest of us to join the fun. 
Make sure to carve out some time to follow along!

--------------Cathy--------------

Does your room need a “prescription” for a change of decor, function or design?  I would love to work with you to help your room "feel better."  
Contact me for more information about my design services.

Wednesday, June 19, 2013

Graduation & Dorm Room Decor

Last Saturday was a great day at our house, as our oldest, Ryan, graduated from high school!
 We could not be prouder of our honors grad...

and future UW Madison student!

How cool that the ceremony took place at the Kohl Center on the UW campus, giving all of us a taste of things to come.

After a celebratory lunch there were graduation gifts to open. Of course some of the gifts were quite practical, things for Ryan's future dorm room like a down quilt, sheets and storage ottomans.


 The most fun gift was from Uncle Scott (my brother) who had a pillow made to replicate one he had seen in an antique store made with a vintage banner. His talented friend Kevin put it all together (Thank you Kevin). The most surprising part of that gift was the fact that without talking to me beforehand, Scott chose the awesome buffalo check, which coordinated perfectly with the sheets and comforter I had chosen.  I made an audible gasp as Ryan opened that gift and we had a good chuckle afterwards about how much we siblings think alike!

What a clever gift, an item that will make quite the statement in the dorm room....

but in the short term will be proudly displayed in the current  bedroom!

Of course as the son of a designer, Ryan's dorm room is going to be well pulled together, I hope his roomie is good with that!!!

Follow my Pinterest board "The Next Phase" to see all of the things that I am collecting as we embark upon this time. I was especially enamored of this site, whose name  is quite irreverent, (so much so that I won't say it here)  but which has real life content regarding dorm room decor!
 UW Madison even has a facebook page dedicated to best UW dorm rooms.

No doubt you will be seeing future posts about how to decorate a dorm room so stay tuned.
What clever ideas do you have for high school graduation gifts or dorm decor?

Finally, don't forget to enter my NOVICA giveaway....

-------------Cathy--------------

Does your room need a “prescription” for a change of decor, function or design?  I would love to work with you to help your room "feel better."  
Contact me for more information about my design services.

Monday, March 7, 2011

Mood Board Monday: Rocking the Casbah

Back in November I participated in a Mood Board Monday  link party hosted by Sarah at
Pewter + Sage.  I explained the concept and shared my own mood board submission here.
Today, Sarah is back with a new challenge, to build a nursery or child's room around one of two convertible cribs by Bonavita.  
 
 Bonavita Peyton Crib
My choice?  A nursery using the Peyton crib, which I felt was a piece of furniture that could work long term for either a boy or a girl.  My inspiration for the room?  I have been smitten of late by many of the block printed fabrics on the market, but particularly of the darling patterns from Rickshaw Design, so I thought this would be a great opportunity to work with them.

Rickshaw Design

I loved the look of this buffet as it is not only colorful, but incorporates some of the hand carved blocks used in the block printing process. What a great investment piece, topped with a changing pad, it could be used initially as a changing table and later in a more grown up way, for storage, perhaps in the same child's room or in any other room.
 
High Fashion Home 

My "Rocking the Casbah" vision includes turquoise walls with one wall stenciled using this pattern...
Cutting Edge Stencils 
Lots of neutral and white help to balance the deep walls, dark woods and bright accessories.  Window treatments  could be sewn from paisley sheets coordinating with the crib bedding and of course you can't have linens with elephants and not give a nod to jungle animals so, here is my mood board, enjoy!

Rock The Casbah


Be sure to check out Pewter + Sage to see all of the great room ideas others have to share on Mood Board Monday, have fun!
 
Does your room need a “prescription” for a change of decor, function or design? If so please contact me,
I would love to help!
Related Posts Plugin for WordPress, Blogger...